OAuth 2.0 Introduction
Introduction
OAuth 2 is an authorization framework that enables applications to obtain limited access to user accounts on an HTTP service, such as Facebook, GitHub, and DigitalOcean. It works by delegating user authentication to the service that hosts the user account, and authorizing third-party applications to access the user account. OAuth 2 provides authorization flows for web and desktop applications, and mobile devices.
OAuth Roles
Resource Owner (user)
The resource owner is the user who authorizes an application to access their account. The application’s access to the user’s account is limited to the “scope” of the authorization granted (e.g. read or write access).
Client (application)
The client is the application that wants to access the user’s account. Before it may do so, it must be authorized by the user, and the authorization must be validated by the API.
Resource Server
The resource server hosts the protected resource user would like to access. The resource server validates the access token, and if valid, serves the request.
Authorization Server
The authorization server verifies the identity of the user and then issues access tokens to the application.
Abstract Protocol Flow
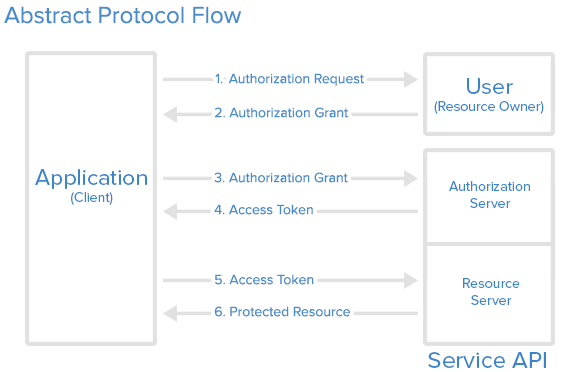
Detailed explanation of the steps in the diagram:
- The application requests authorization to access service resources from the user.
- If the user authorized the request, the application receives an authorization grant.
- The application requests an access token from the authorization server (API) by presenting authentication of its own identity, the authorization grant.
- If the application identity is authenticated and the authorization grant is valid, the authorization server (API) issues an access token to the application. Authorization is complete.
- The application requests the resource from the resource server (API) and presents the access token for authentication.
- If the access token is valid, the resource server (API) serves the resource to the application.
Example
Take an example, we develop an app and hopes user can view his profile from the app, where user’s profile info is stored in Microsoft Graph Service. In this scenario, roles are as below:
- Resource Onwer: user
- Client: the application
- Resource Server: The Microsoft Graph Server
- Authorization Server (the identity provider): Azure Activity Directory (AAD)
To realize the OAuth flow, we register an app registration on AAD for our application. When user want to get his profile when using the app:
- Our app ask user for authorization grant
- User consent the scope the app ask for the graph server.
- With the authorization grant, the app can ask AAD for access token to get profile from the Graph Server.
- The AAD server validate the authorization grant and give the access token to the app.
- With the access token, the app is able to turn to the Graph Server to get user’s profile.
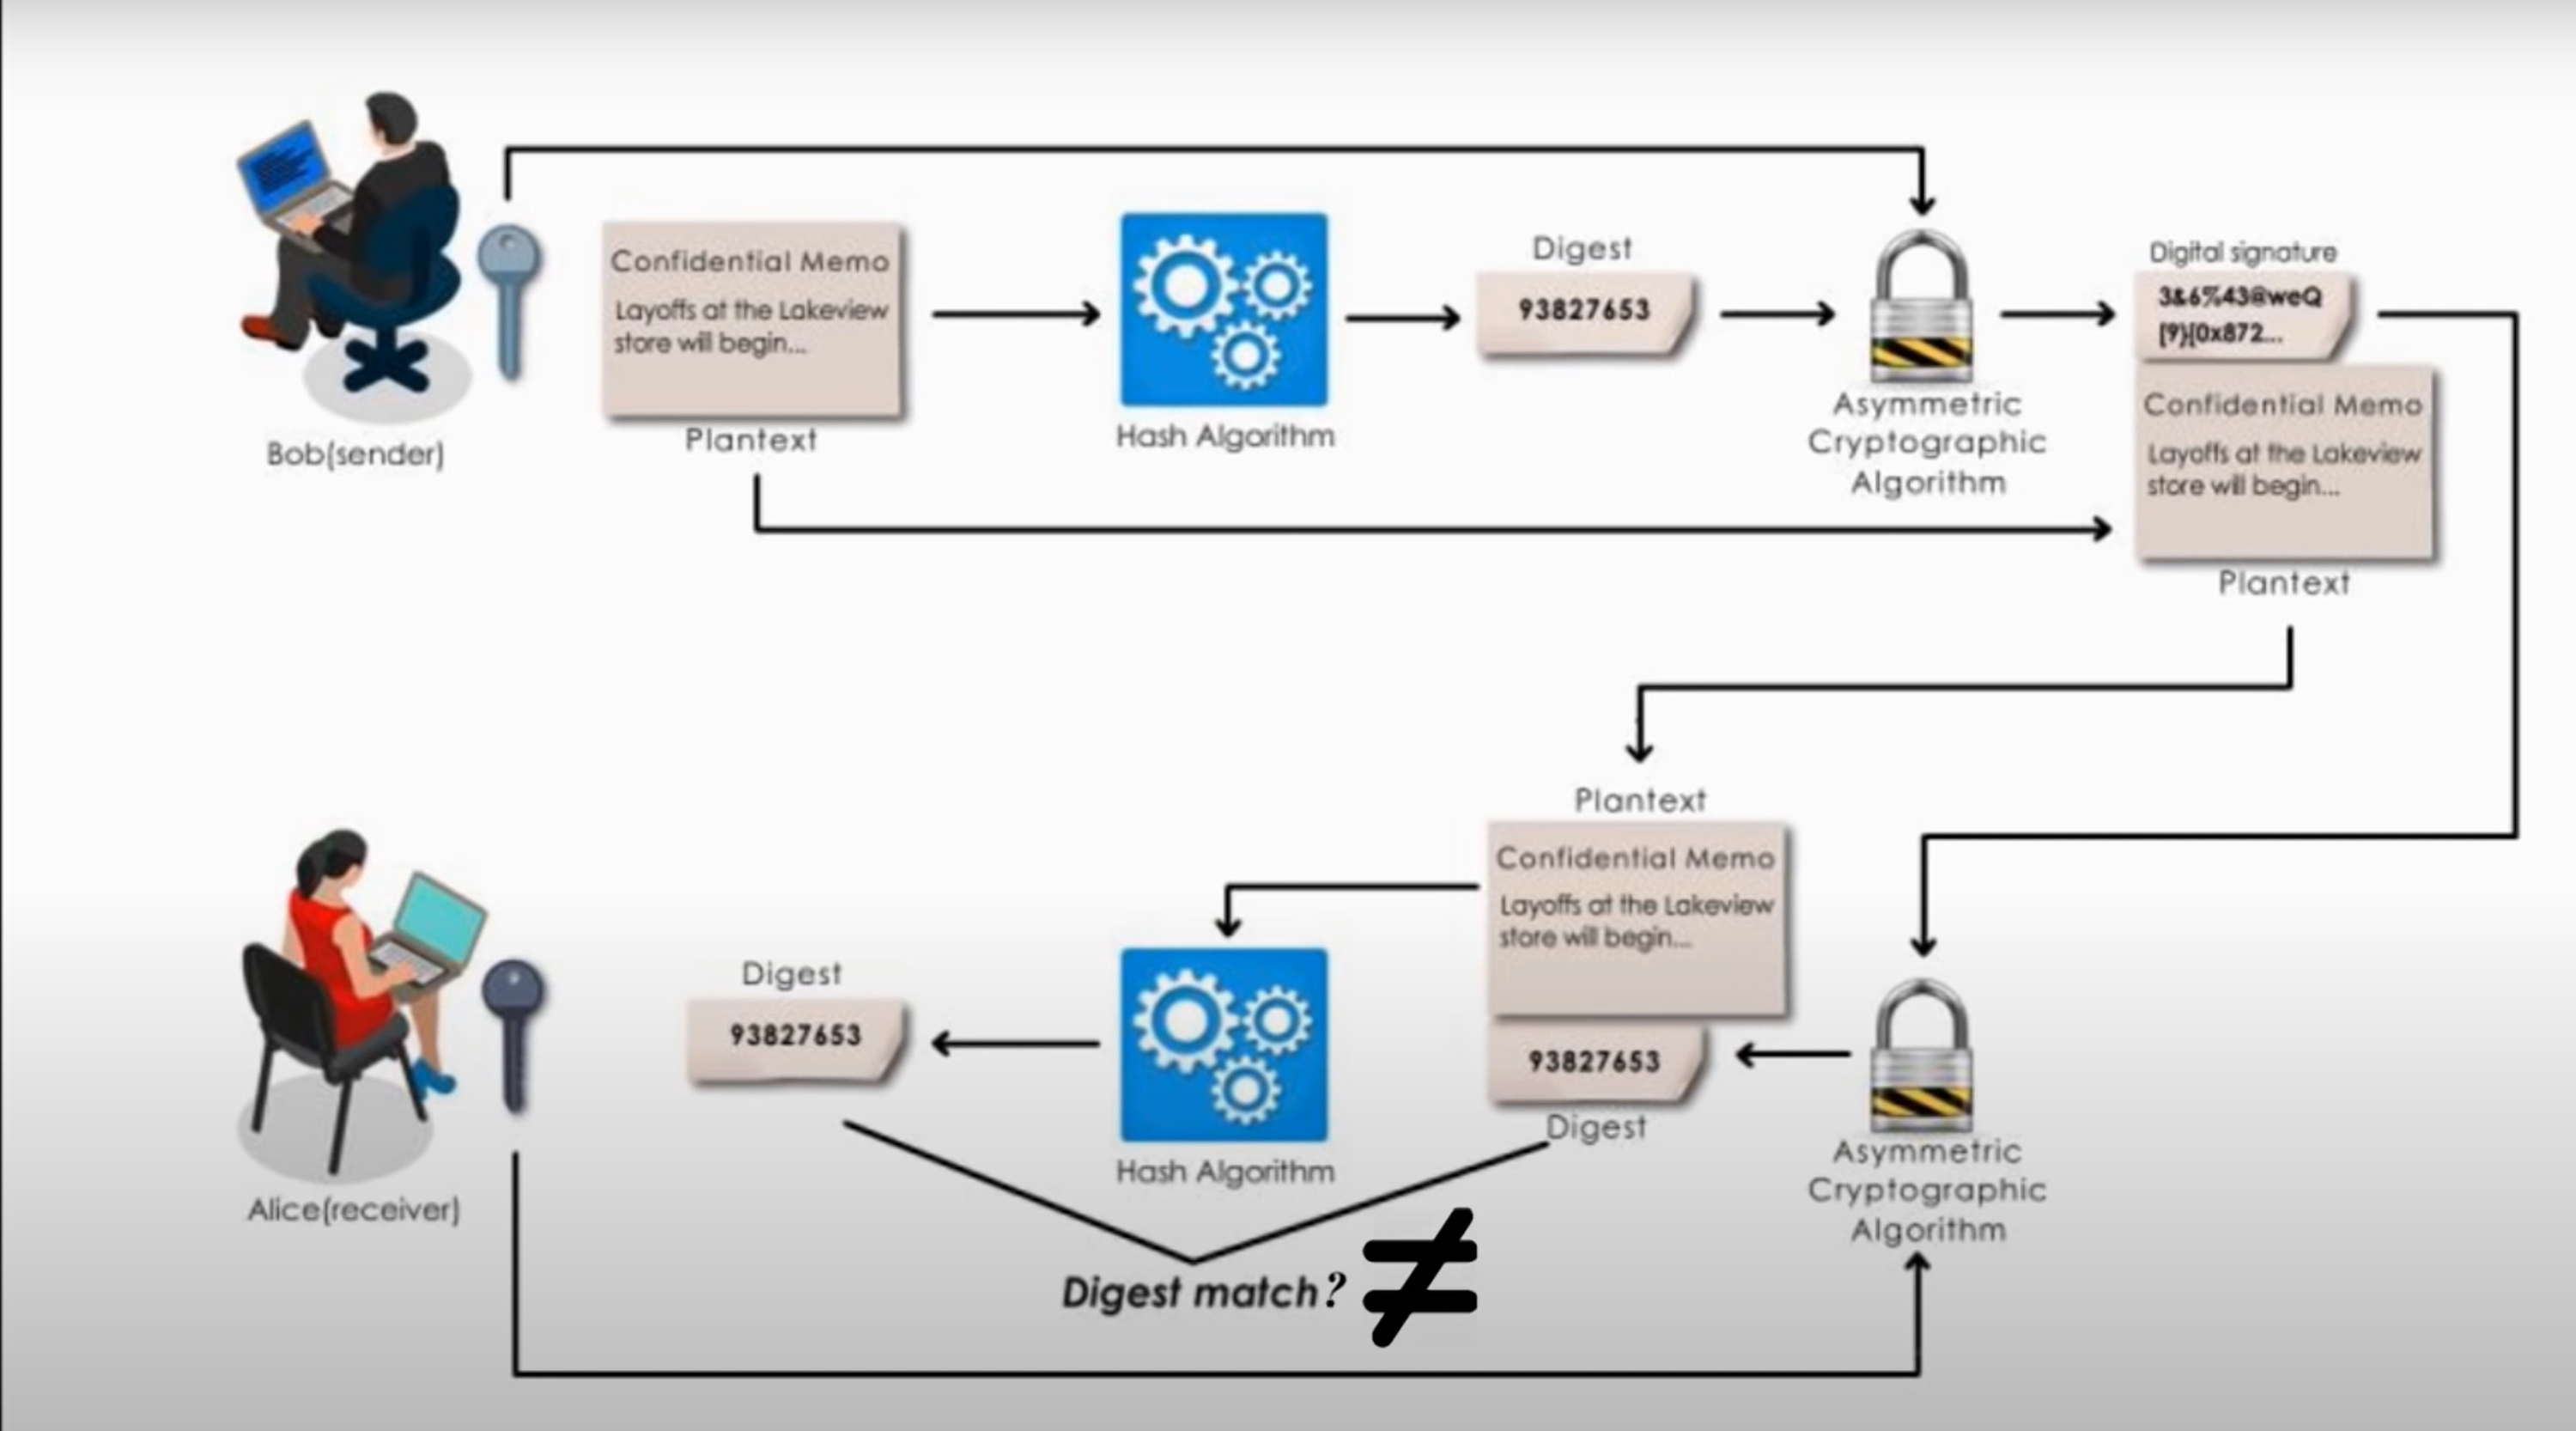
Authentication VS Authorization
Authentication 验证
Authentication is the process of proving that you are who you say you are.
The Microsoft identity platform uses the OpenID Connect protocol for handling authentication.
Authorization 授权
Authorization is the act of granting an authenticated party permission to do something. It specifies what data you’re allowed to access and what you can do with that data.
The Microsoft identity platform uses the OAuth 2.0 protocol for handling authorization.
Authorization Grant Types
- Authorization Code: used with server-side Applications
- Implicit: used with Mobile Apps or Web Applications (applications that run on the user’s device)
- Resource Owner Password Credentials: used with trusted Applications, such as those owned by the service itself
- Client Credentials: used with Applications API access
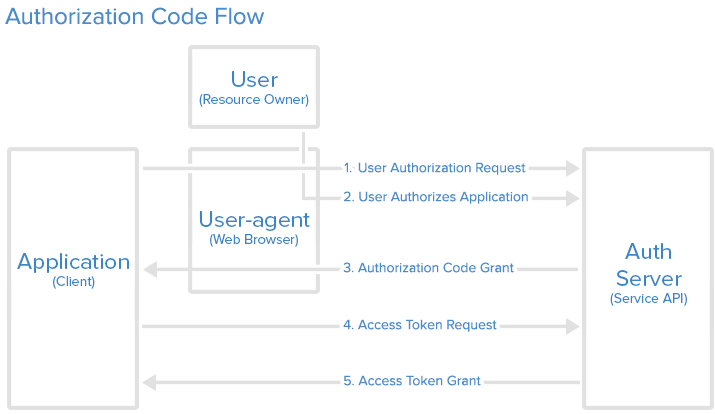
Authorization Code
The authorization code grant type is the most commonly used because it is optimized for server-side applications, where source code is not publicly exposed, and Client Secret confidentiality can be maintained. This is a redirection-based flow, which means that the application must be capable of interacting with the user-agent (i.e. the user’s web browser) and receiving API authorization codes that are routed through the user-agent.
授权码(authorization code)方式,指的是第三方应用先申请一个授权码,然后再用该码获取令牌。
这种方式是最常用的流程,安全性也最高,它适用于那些有后端的 Web 应用。授权码通过前端传送,令牌则是储存在后端,而且所有与资源服务器的通信都在后端完成。这样的前后端分离,可以避免令牌泄漏。
Step 1: Authorization Code Link
1 | https://cloud.digitalocean.com/v1/oauth/authorize?response_type=code&client_id=CLIENT_ID&redirect_uri=CALLBACK_URL&scope=read |
Here is an explanation of the link components:
- https://cloud.digitalocean.com/v1/oauth/authorize: the API authorization endpoint
- client_id=client_id: the application’s client ID (how the API identifies the application)
- redirect_uri=CALLBACK_URL: where the service redirects the user-agent after an authorization code is granted
- response_type=code: specifies that your application is requesting an authorization code grant
- scope=read: specifies the level of access that the application is requesting
Step 2: User Authorizes Application
When the user clicks the link, they must first log in to the service, to authenticate their identity (unless they are already logged in). Then they will be prompted by the service to authorize or deny the application access to their account.
Step 3: Application Receives Authorization Code
If the user clicks “Authorize Application”, the service redirects the user-agent to the application redirect URI, which was specified during the client registration, along with an authorization code.
1 | https://dropletbook.com/callback?code=AUTHORIZATION_CODE |
Step 4: Application Requests Access Token
1 | https://cloud.digitalocean.com/v1/oauth/token?client_id=CLIENT_ID&client_secret=CLIENT_SECRET&grant_type=authorization_code&code=AUTHORIZATION_CODE&redirect_uri=CALLBACK_URL |
Step 5: Application Receives Access Token
1 | {"access_token":"ACCESS_TOKEN","token_type":"bearer","expires_in":2592000,"refresh_token":"REFRESH_TOKEN","scope":"read","uid":100101,"info":{"name":"Mark E. Mark","email":"mark@thefunkybunch.com"}} |
Implicit
The implicit grant type is used for mobile apps and web applications (i.e. applications that run in a web browser), where the client secret confidentiality is not guaranteed. The implicit grant type is also a redirection-based flow but the access token is given to the user-agent to forward to the application, so it may be exposed to the user and other applications on the user’s device. Also, this flow does not authenticate the identity of the application, and relies on the redirect URI (that was registered with the service) to serve this purpose.
The implicit grant type does not support refresh tokens.
The implicit grant flow basically works as follows: the user is asked to authorize the application, then the authorization server passes the access token back to the user-agent, which passes it to the application. If you are curious about the details, read on.
有些 Web 应用是纯前端应用,没有后端。这时就不能用上面的方式了,必须将令牌储存在前端。RFC 6749 就规定了第二种方式,允许直接向前端颁发令牌。这种方式没有授权码这个中间步骤,所以称为(授权码)”隐藏式”(implicit)。
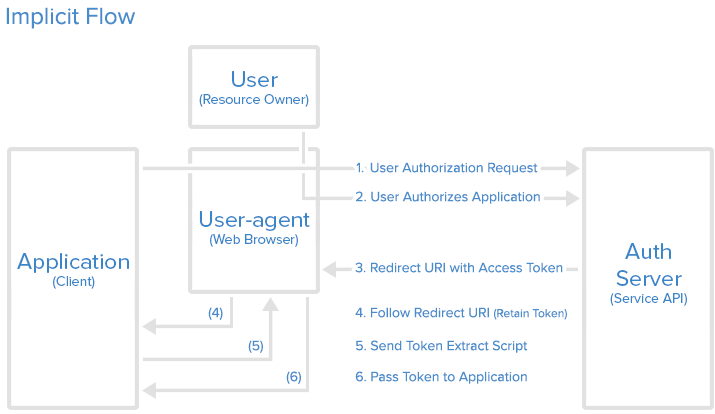
Step 1: Implicit Authorization Link
1 | https://cloud.digitalocean.com/v1/oauth/authorize?response_type=token&client_id=CLIENT_ID&redirect_uri=CALLBACK_URL&scope=read |
Step 2: User Authorizes Application
注意,令牌的位置是 URL 锚点(fragment),而不是查询字符串(querystring),这是因为 OAuth 2.0 允许跳转网址是 HTTP 协议,因此存在”中间人攻击”的风险,而浏览器跳转时,锚点不会发到服务器,就减少了泄漏令牌的风险。